Concrete Polishing System

Ultimate Guide to Concrete Floor Polishing: Step-by-Step Process, Tools, and Expert Tips for a Mirror-Like Finish

If you’ve been searching for the secret to achieving a high-gloss polished concrete floors, look no further. In this comprehensive guide, we’ll take you through the step-by-step process of the RetroPlate Concrete Floor Polishing System to help you achieve that stunning finish you’ve always dreamed of.

Plain concrete is dull and visually unappealing. The RetroPlate Concrete Polishing System breathes new life into both new and existing floors with stunning customization, beauty, polish, and shine! Whether you’re working with fresh concrete or transforming tired, old surfaces, RetroPlate turns lackluster floors into sleek, vibrant masterpieces that make a lasting impression. 

With our expert tips and techniques, you’ll learn how to properly prepare your concrete surface, apply the right steps, and use the right polishing products and tools, to achieve that glossy, mirror-like shine that will leave your floors looking brand new. Whether you’re a homeowner looking to revitalize your indoor spaces or a business owner wanting to impress your clients with a sleek and polished floor, this guide has got you covered.

We understand that every floor is unique, which is why we’ll also provide solutions for common challenges you may encounter along the way. From repairing cracks to stain removal, we’ll ensure your floors look flawless and impressive.

If you’re ready to transform your concrete floors into works of art, let’s dive into the complete guide to achieving a high-gloss shine with concrete floor polishing.

Moxtek-Marcos-ProvoUT-Apr2017-RP (9)

Benefits of Concrete Floor Polishing

Concrete floor polishing is a transformative process that enhances not only the strength and durability, but also the aesthetics of your concrete surfaces. By polishing your concrete floors, you can enjoy a range of benefits that make it a worthwhile investment for both commercial, industrial and even residential properties.

Enhanced Durability and Longevity

The concrete polishing process not only creates a beautiful, lasting shine but also strengthens the concrete. The use of the Ashford Formula densifier, used in the RetroPlate Concrete Polishing System, chemically hardens the concrete surface, increasing its resistance to wear and tear. This treatment significantly extends the lifespan of your floors, making them a more cost-effective option in the long run. 

Low Maintenance and Easy Cleaning

Polished concrete floors are incredibly easy to maintain. Unlike traditional flooring materials, such as tile or hardwood that often require frequent stripping and retreatment with coatings, polished concrete requires minimal upkeep. The smooth, non-porous surface helps provide protection against stains, spills, and other topical damage, and only requires routine cleaning with a pH-balanced cleaner, like Curecrete’s CreteClean Plus with Scar Guard, that matches the pH of concrete. Using a mop and bucket or an auto scrubber 2-3 times a week (depending on the level of traffic) is all it takes to maintain the floor’s appearance and longevity.

Aesthetic Versatility

Polished concrete offers a sleek, modern appearance that can be customized to match any design aesthetic. Whether you prefer a high-gloss finish or a more satin look, the polishing process can be tailored to achieve the desired level of reflectivity. Additionally, you can incorporate decorative elements, such as stains or dyes, logos and patterns to further enhance the visual appeal of your floors.

Contact Us

Get help with Concrete Polishing

Name(Required)
Email(Required)
Need help with your concrete project? Have a question for us? Ask away.

PrivateCareShowroom_Sydney-AUSTRALIA_3-2018_RP_RetroPlateAustralia_CallumOneill (4)

Understanding the Concrete Floor Polishing Process

The process of concrete floor polishing involves several key steps that gradually transform a rough concrete surface into a smooth, reflective finish. Here’s a closer look at each phase of the process:

1. Surface Preparation

Proper surface preparation is critical to the success of the polishing process. This step involves cleaning the concrete to remove any dirt, debris, or coatings that could interfere with the grinding and polishing. A thorough inspection is also conducted to identify and repair any cracks, chips, or imperfections.

2. Grinding

The grinding process involves using coarse diamond-embedded tools and grinding machinery to remove the top layer of the concrete surface. This step exposes the underlying concrete, creating a smooth and even base for subsequent steps. The grinding phase may involve multiple passes, depending on the condition of the concrete and the desired finish.

3. Honing

Honing uses progressively finer diamond tools to further smooth and refine the concrete surface. This step helps to remove any remaining scratches or blemishes left behind by the grinding process, increasing the shine and reflectivity of the concrete in preparation for the final polishing.

4. Densification

The RetroPlate densifier is then applied to the honed concrete surface to chemically harden and densify the concrete. This step enhances the concrete’s durability, making it more resistant to wear and damage, and also allows the for a longer lasting polished shine.

5. Polishing

The final polishing step uses fine grit diamond tools to polish the concrete to a high-gloss, mirror-like finish. Multiple passes with increasingly finer grit levels of diamond tools are used to achieve the desired level of shine.

6. Sealing and Burnishing

For extra protection, applying a topical concrete sealer can safeguard high-traffic or spill-prone areas, extending the appearance of the polished surface. A final burnishing with a soft polishing pad will leave an enhanced, high-gloss finish.

PohankaVWDealership_Salisbury-MD-USA_07-2020_RP_MasterApplications_ToddGuntner (7)

Tools and Equipment Needed for Concrete Floor Polishing

Achieving a high-gloss shine with concrete floor polishing requires the use of specialized tools and equipment. Investing in the right tools can make the polishing process more efficient, effective, and safer for the operator.

Floor Grinders & Polishing Machines: These are powerful machines equipped with diamond-embedded discs or pads that are essential for grinding and polishing concrete surfaces. Larger commercial-grade grinders are typically used for bigger projects, while smaller, handheld models are more suitable for smaller, narrower spaces.

Wet/Dry Vacuums: These powerful vacuums are used to collect the dust and debris generated during the grinding and polishing process (when grinding dry), ensuring a clean and safe work environment.

Diamond Grinding & Polishing Tools: These specialized tools, available in a range of grit sizes, are used in conjunction with the floor grinder to gradually refine the concrete surface from rough to very smooth.

Concrete Densifiers and Sealers: Densifiers like the RetroPlate densifier enhance the durability and hardness of the concrete and also dustproof it. Topical sealers (optional) can be applied to protect the surface and enhance the shine. 

Safety Equipment: Proper personal protective equipment (PPE), such as safety glasses, dust masks, and gloves, is crucial for ensuring the safety of the operator during the polishing process.

TonysFreshMarket_RoundLakeBeach-IL_RP_7-2021_44000sqf_BarefootConcreteCoatings_BobDonahueJennBurke (1)

Step-by-Step Guide to Achieving a High-Gloss Shine

Follow this methodical approach to achieve a stunning, high-gloss shine on your concrete floors:

  1. Prepare the Surface: Clean the concrete thoroughly to remove any dirt, debris, or existing coatings.
  2. Grind the Concrete: Start with low-grit, coarse diamond tools to remove surface imperfections and create a smooth, uniform surface.
  3. Hone the Concrete: Use progressively finer grit diamond tools to refine the surface and prepare it for polishing.
  4. Apply a Concrete Densifier: Use the RetroPlate densifier to chemically strengthen and harden the concrete, enhancing its durability and shine for a lifetime. 
  5. Polish the Concrete: Begin polishing the floor with diamond tools and gradually work your way up to higher grit diamonds.
  6. Apply a Topical Sealer (Optional): This step provides additional protection from harmful stains and damage.
  7. Perform a Final Buffing: Use a high-speed burnishing machine to enhance the reflectivity and shine of the topical sealer.

Common Mistakes to Avoid During the Polishing Process

Avoid these common pitfalls to ensure a successful concrete floor polishing project:

  • Rushing Through the Process: Skipping or hastily completing the grinding and honing stages can result in an uneven or inconsistent surface, making it difficult to achieve a high-gloss finish.
  • Using the Wrong Grit Diamond Tools: Progressing too quickly through the grit sizes can lead to a dull or uneven finish. Follow the recommended sequence of grit sizes to achieve the desired shine.
  • Improper Use of the Floor Grinder: Applying too much pressure or operating the grinder at the wrong angle can create uneven wear patterns or damage the concrete surface.
  • Neglecting Surface Cleaning: Failing to clean the floor between polishing steps can result in an uneven or subpar finish.
  • Skipping Densifiers: Products like the RetroPlate densifier are essential for enhancing the durability and reflectivity of the polished surface and making it last a lifetime. 

Maintaining and Caring for Polished Concrete Floors

Proper maintenance is essential to preserving the high-gloss shine of your polished concrete floors. Here are some tips:

  • Regular Cleaning: Sweep or dust mop the floors daily to remove loose dirt and debris. Using a mop and bucket or an auto scrubber 2-3 times a week (depending on the level of traffic) with a pH-balanced cleaner, like Curecrete’s CreteClean Plus with Scar Guard, that matches the pH of concrete, is all it takes to maintain the floor’s appearance and longevity.
  • Avoid Harsh Cleaners: Steer clear of abrasive or acidic cleaners that can damage and deteriorate the polished surface.
  • Protect the Surface: Use protective pads or coasters under large equipment and furniture legs to prevent scratches or indentations.

Hiring a Professional Concrete Floor Polishing Service

While DIY concrete floor polishing is possible, hiring a professional service can provide several benefits:

  • Expertise: Professionals have extensive knowledge of the polishing process and the appropriate tools and materials to use.
  • Specialized Equipment: Professional services have access to powerful floor grinders, vacuums, and burnishing machines.
  • Time and Effort Savings: Letting professionals handle the project saves time and money.
  • RetroPlate Certified Polished Concrete Applicators: Contact a RetroPlate Certified Concrete Polishing Applicator | Contact Us

The RetroPlate Concrete Polishing System follows these basic steps performed by our Certified Applicators ensuring that every floor turns out just right.
.


.

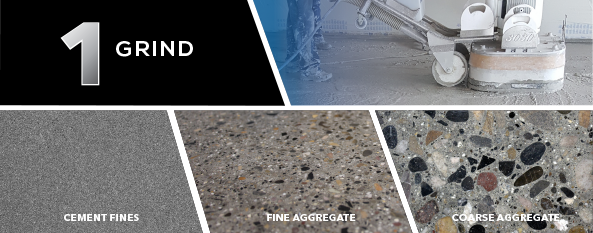
The first step is to grind the floor with industrial strength diamonds. Grinding removes imperfections, marks and scratches, and exposes bare concrete by removing existing coatings or mastic. Grinding can be light to heavy depending on the desired level of exposed aggregate. A new floor’s colored aggregate, recycled glass or other decorative material can be broadcast into the surface to be exposed during the grinding process.
.


.


.

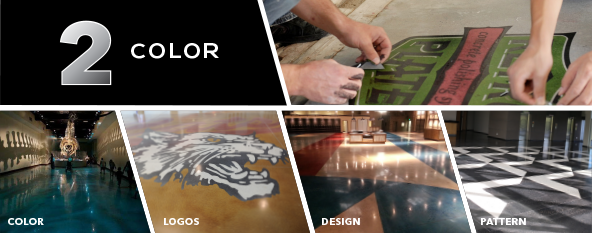
Add style and personality to your polished concrete floors with an array of color options.  Achieve any look and style with full color floors, custom logos or unique patterns.  Color options for polished concrete include: integral color, dry shake and topical dyes and stains.
.


.

.

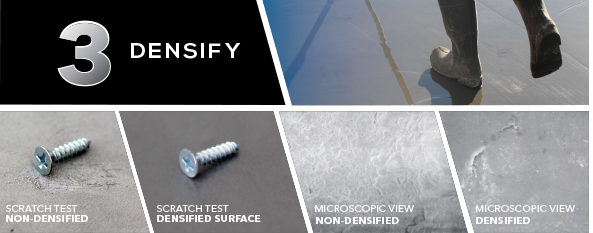
The next step is to densify the floor with RetroPlate. RetroPlate penetrates the concrete and chemically reacts to harden and densify the floor by filling-in pores and creating a dense surface. Densification is key to the long-term benefits of polished concrete. Many densifiers on the market claim to work for polished concrete, but there is only one RetroPlate.

.


.

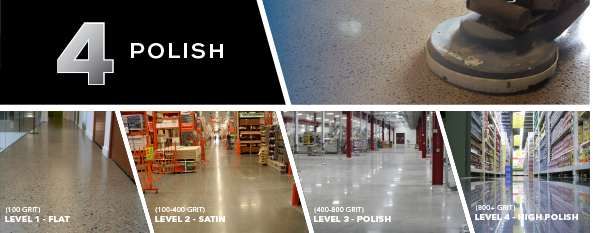
The final step is to polish the floor with progressively finer diamond grits. This polishing procedure is what produces the floor’s sheen. A floor can be polished to a flat (ground), satin (honed), polished or highly polished finish. Adding color or seeded material allows for unlimited possibilities in design.


Ready to transform your concrete floors with a polished, high-performance finish? Backed by Curecrete—the industry leader in concrete floor treatments—and strengthened by the proven densification power of the Ashford Formula, RetroPlate® delivers results that combine beauty, durability, and long-term value. Whether you’re planning a new project or upgrading an existing floor, our expert team is here to help.

📞 Call us at (802)-588-8378
📧 Email us at Marketing@Curecrete.com
🔗 Contact us today to get started.

Let’s bring your concrete floors to life—with lasting performance and shine.

Go to Curecrete Connect